Showing posts with label Cupcakes. Show all posts

Sunday, September 22, 2013

Star's Favorite Things: Spruce Up Your Tailgate!

The time has come to bid farewell to our bikinis and flip flops and replace them with scarves and boots.  Today marks the first day of fall and with fall comes football.  I'm not so much a fan of football, but I love a good tailgate!  Especially when it is filled with gourmet food options, unique beverages and adorable decor.  Football season is already in full swing so I thought I'd share with you some of my favorite tailgate pics.  They put a fun spin on traditional tailgate fare, and will make your tailgate unique and just a little bit chic! :)

    1. 1. This ice chest will keep your drinks as cold as the basic plastic ones, its just so much cuter! -  Peterboro Basket Co. 
    2. 2. Package napkins and utensils in these adorable little chevron paper bags.  Brown and white would be cute (the colors of a football) or use your team's colors! - Etsy shop Cherished Blessings 
    3. 3. If you are not a beer drinker, you can still sip your wine in (unbreakable) style :) -  Pinterest 
    4. 4. I'f you'll be barbecuing at your tailgate, I don't think any other grill will do.  This one is both adorable and functional! -  Strauss Inovation 
    5. 5. My love affair with paper straws has not ended (see previous post).  They come in every color so it is easy to match them with your team colors. - Etsy shop The Simply Chic Shop 
    6. 6. No tailgate is complete without Cornhole.  It quick to set up and can easily be played with a few drinks in you :)  Love this retro design! -  Gifts.com 
    7. 7. Keep those brewskies cold with these cute personalized koozies. - Etsy shop Happy Thoughts Gifts 
    8. 8. I love these football cupcake toppers!  They'd also look great topping pigs in a blanket, potato skins, or any other tailgate delight.  - Etsy shop Cute and Useful

Beer is generally the drink of choice at a tailgate so you want to make sure you have plenty of it on hand.  In addition to a variety of frosty bottles, consider mixing up a signature "beer cocktail" as well. Virtue Feed & Grain in Alexandria VA serves up this delicious beer cocktail.  Its a masculine cocktail with a touch of sweetness for the lovely ladies.  With the little bit of maple syrup, it is the perfect fall beverage!
Photo courtesy of Honest Cooking

Shock Me
1/4 cup brown ale beer
2 tbsp. bourbon
1 tsp. Southern Comfort
1 tsp. pure maple syrup

Combine all ingredients in a cocktail shaker with ice. 
Gently stir for 10 seconds.  Strain into an Old Fashioned glass.  Makes 1 cocktail.

And for the perfect dessert - Blue Moon Cupcakes.  I shared this recipe last year, but I thought I'd mention it again because it is so delicious and perfect for a tailgate!  Click here for the recipe.


Lastly, I wanted to share the little surprise I made for my hubby on the night of his favorite team's (the San Diego Chargers) first game.  Inside was a new Chargers T-shirt.  He loved the gift and appreciated that although I am not into football, I still understand how excited he is that the season has started :)  Consider wrapping up a T-shrit or jersey for that football loving honey before a big game!


Happy tailgating!!

-Star

Wednesday, October 31, 2012

Star's Favorite Things: Halloween Fun!

Happy Halloween!  We celebrated Halloween this past weekend by hosting a casual get together in our home.  It featured yummy festive and fall inspired treats and lots of DIY decor.  Below are a few photos of some of the fun elements.  All photos were taken by the talented Christine Collins of Collins Clan Photography

I made a ghost out of cheesecloth and fabric stiffener. This was an easy craft and extremely inexpensive! Thank you Pinterest and the Everyday is a Crafting Day blog for the idea! 

A few years ago I purchased a couple cases of mason jars from my local grocery store and use them all the time!  They make great vases, candle holders and of course, beverage glasses!  I tie ribbon, tulle or raffia around the top in various colors depending on the occasion, and I end up with a decor element that appears to be tailor made for the event at hand.  As you know, I love paper straws (as you can see from my previous post) and utilized black and orange ones for the beverages which were served in mason jars tied with black tulle.  This was super quick, inexpensive and so much more fun than plastic cups! 

A friend of ours brought over the adorable carved pumpkin.  Love the simple yet creative little face on it!
 
Lots of delicious snacks and goodies were served... below are some of my favorites! I've been making the chocolate dipped apricots for a while now and they are super easy. Simply dip dried apricots in melted chocolate until they are halfway covered, lay on parchment paper and top with a whole almond before the chocolate dries. Simple and delicious and very Halloweenie!

We served carrots and ranch in little shot glasses which made for perfect little portions.
The marshmallow people were hand dipped in food coloring then in chocolate and finished off with little chocolate eyes. This was so fun, I know I'll be making them again in the future and I'll definitely share the DIY tutorial with you. Stay tuned!
Cheetos were served in little paper cones and I glued googalie eyes to them to add a little fun!
Because in my opinion, you can't have a party without cake, chocolate cupcakes were served alongside delicious caramel apples slices (which I happen to think are the perfect Halloween treat)!

This is our our little man's first Halloween and we've had so much fun introducing him to all that this holiday has to offer! We even stuck him in a pumpkin for a quick photo. He wasn't too sure what to do so he just started gnawing on the side!   


Happy Halloween from the Sterling Team!

XOXO,

Star

Tuesday, July 17, 2012

Star's Favorite Sweets: Blue Moon Cupcakes

The weather is warming up, summer is in full bloom and BBQ season calls for fun recipes!  I'm not normally a beer drinker but I really enjoy a cold Blue Moon this time of year.  When I came across this recipe for Blue Moon Cupcakes on Pinterest, I knew I had to try it!  These little cakes are exactly what they sound like: yummy cupcakes that look and taste like delicious Blue Moon Belgian Ale. The cake has a slight citrus flavor and you can taste a hint of the wheat in the background from the beer.  The frosting is absolutely delicious!  It is light and fluffy, just like the foam on top of the beer.  The frosting truly is my favorite part of the cupcake and I plan to use it for many various types of cupcakes in the future.  This is such a fun recipe - I just had to share it with you!  

I have now taken these cupcakes to a few different events and they are always a crowd pleaser.  They are a great treat to whip up for summer time events and I can guarantee that the men in your life will be in awe!  Make sure you bring along some beers (Blue Moons, of course) to complete the experience!


Isn't this a beautiful cupcake?!  It just begs to be eaten... and washed down with a cold Blue Moon!


Blue Moon Cupcakes
3/4 c unsalted butter, softened
1 3/4 c sugar
2 1/2 c flour
2 1/2 tsp baking powder
1/2 tsp salt
3 eggs, room temperature
1 tsp vanilla
2 drops red food coloring
10 drops yellow food coloring
1/2 tsp orange zest
1 c Blue Moon beer
1/4 c milk
Frothy White Frosting [recipe follows]
small orange slices, for garnish

Directions:
1. Line 24 cupcake trays with liners. [Use white liners if you can, they become translucent during baking and really sell the mini Blue Moon image]. In a medium bowl, mix together flour, baking power and salt.
2. In a large bowl beat butter on medium speed for 30 seconds. Add sugar a little bit at a time, beating well. Once it's all added beat for 2 more minutes.
3. Add eggs, beating after each.
4. Add vanilla, food coloring and orange zest and beat.
5. Mix beer and milk in a measuring cup. Alternatively add beer / milk mixture and flour mixture to butter mixture in the large bowl, beating after each. End on the flour mixture.
6. Fill cupcake liners 2/3 full. Bake for 18 minutes at 375 degrees F until cupcakes are golden and a toothpick inserted in center comes out clean.
7. Once cool, frost each cupcake with a generous amount of frosting. Just before serving, garnish each with a small orange slice.

Frothy White Frosting
2 egg whites, room temperature
1 tsp vanilla extract
1 tbsp orange juice
1 c sugar
1/4 tsp cream of tartar
1/3 c water

Directions:
1. In a saucepan, mix sugar, water and cream of tartar. Cook on medium heat until sugar is dissolved and mixture is bubbly.
2. In a large bowl, beat egg whites, vanilla and orange juice until soft peaks form. Slowly add hot sugar mixture, beating continuously. Beat for 7 minutes until stiff peaks form.

Recipe courtesy of Miss Make


Happy Baking,
Star

Saturday, April 14, 2012

DIY with Star: Rose Infused Sugar Cubes/Hearts

I'd like to share with you one of my fun new kitchen purchases: rose water.  I've been drinking a lot of tea lately and have been enjoying a certain rose flavored loose black tea my mother gave me over the holidays.  Unfortunately, I've run out of it and plain black tea lacks the rose flavor I've come to love.  While perusing the Internet recently, I came across a bottle of French food grade rose water.  I purchased it with the intention to add it to my tea.  I've seen recipes for homemade sugar cubes on Pinterest and thought rose flavored sugar cubes would be the perfect addition to my tea.  Alejandra Ramos, author of food blog Always Order Dessert has posted a rose water infused sugar cube recipe which I used as my base.

Photos courtesy of Always Order Dessert

Here is the recipe:

Homemade Flavored Sugar Cubes

Ingredients

1.5 cups granulated white sugar
2 teaspoons flavoring such as rosewater, orange blossom water, or fresh lemon juice
2 teaspoons plain water 
1-2 drops food coloring of your choice (I used 3 drops red to get this bright pink color, 2 drops yellow for the yellow, and 2-3 drops each red and blue for the purple)

Method
Pour the sugar into a large bowl. In a separate small cup, combine the rosewater, water, and food coloring. Pour the rosewater mixture into the sugar and mix thoroughly until evenly combined. The texture should feel and look like wet sand with a bit of fluff to it. If the mixture is too wet, add granulated sugar by the tablespoon until the texture is right (this might be the case if you live in a very humid climate). If it's too dry, add a bit more water. 
Pour the sugar onto a parchment-lined baking sheet and use your hands to pack into a flat, compact rectangle. Use a bench scraper or knife to cut the block across in rows and then again in perpendicular rows, creating approximately 1/2 inch cubes. Leave the cubes to dry for about 30 minutes, before separating gently and letting dry an additional 20 minutes. 

To make molded cubes: pack the wet sugar mixture tightly into a small (about 1" to 1.5") cookie cutter on a piece of parchment paper. Gently lift the cutter off and let the sugar dry for 30 minutes before moving onto a drying rack and letting dry on the reverse side. Repeat for each cube until completely dry (about an hour).
When completely dry (you should be able to squeeze a cube gently without it breaking apart, you can serve in a regular sugar bowl, or store in an air-tight container.

My DIY Tutorial

I made the cubes as well as molded hearts and both turned out great and were so fun to make!  Below is my tutorial for the molded hear shaped ones (my method differed slightly from the above).

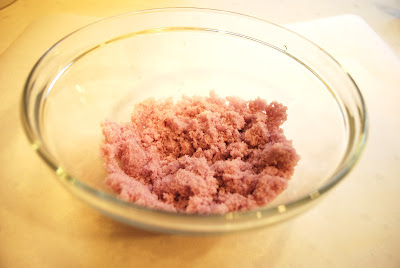
I started with the ingredients listed above (I mixed red and blue food coloring to get the purple color below).  Once mixed together, it was the consistency of wet sand:


Rather than packing the sugar into the cutter, I pressed it down on a sheet of parchment paper and used the cutter to cut out heart shapes - like you would sugar cookies:


I let them dry for about 30 minutes, then flipped them and let them dry over night.

These little babies were delicious in my tea and added just the right amount of rose flavor.  If you try this recipe with rose water, make sure to start with just a bit as a little goes a long way and the flavor can quickly become overpowering.  Alejandra Ramos, of food Always Order Dessert suggests adding a few to a glass of Champagne or white wine which I think sounds lovely!  I recently made delicious vanilla cupcakes with vanilla butter cream (recipe to come) and topped them with these sugar hearts.  They were a big hit!


Think of the color and flavor combinations you could try!  These cubes or hearts would be so cute at a wedding, shower or just for you for your afternoon tea.  I think I may have to try making these with orange blossom water or lavender syrup next!

Enjoy,
Star

Saturday, March 10, 2012

Star's Favorite Things: Pink Champagne Cake

Today I'd like to share with you one of my new favorite recipes: Pink Champagne Cake.  This cake has quickly become one the most delicious and beautiful cakes I've ever had... I don't know if it is the light fluffy texture, the beautiful pink color, or the amazing aroma with just a hint of Champagne. This beautiful cake is It is both elegant and unexpected.  Any way you slice it, Pink Champagne Cake is the perfect dessert for a bridal shower, anniversary, Valentine's Day or New Year's Eve!

Photo courtesy of Booze Cakes by Krystina Castella and Terry Lee Stone

This recipe comes from the book "Booze Cakes" by Krystina Castell and Terry Lee Stone which was given to me by a friend for my last birthday.  This fun book is filled with unique dessert recipes and "booze" is incorporate in every single one!  Who knew the hard stuff could liven up so many different baked goods!?!


Photo courtesy of Booze Cakes by Krystina Castella and Terry Lee Stone
You can buy this book on Amazon

Each recipe incorporates a different type of alcohol to create a mouth watering dessert... from Tipsy Tiramisu, to Strawberry Daiquiri Shortcakes, to Blue Hawaii Pineapple Upside-Down Cupcakes to Rum-and-Coke Whoopie Pies!  ... But, the Pink Champagne Cake happens to be my favorite! According to the authors of the book, "Traditionally, a Champagne Cake is a white cake layered with rum, Bavarian or whipped cream filling, pink buttercream icing - and not an ounce of Champagne! This recipe lightens the crumb by including a splash of bubbly".  

Champagne is appropriate at any celebration, whether in a glass or in a cake!  This is a recipe you must try (with a glass of Champagne in your hand of course)!

RECIPE

INGREDIENTS:
PINK CHAMPAGNE CAKE
3 cups all-purpose flour
3 tsp. baking powder
1/2 tsp. salt
1 cup (2 American sticks) unsalted butter
2 cups sugar
1 tsp. vanilla extract
6 egg whites
A few drops of red food coloring (the cake doesn't appear to be colored in the photo, so I would consider this to be optional)
2 cups Champagne

PINK CHAMPAGNE FROSTING
3/4 cup (1-1/2 American sticks) unsalted butter
4 cups confectioners' (icing) sugar
1/2 cup Champagne
1/4 cup whole milk
1 Tblsp. vanilla extract
A few drops of red food coloring

INSTRUCTIONS:
  • Preheat oven to 350 F/ 180 C.  Grease and flour two 9-inch round cake pans.
  • In a bowl, combine flour, baking powder, and salt; set aside.  In a mixing bowl, beat butter and sugar 3-5 minutes, or until light and fluffy.  Add vanilla and beat in egg whites one at a time.
  • Mix in food coloring.  Beat in flour mixture and Champagne in three alternating additions, starting and ending with flour to prevent curdling.  Pour batter into pans and bake 35 minutes, or until a knife inserted in the center comes out clean.
  • For the frosting: In a mixing bowl, beat butter 1 minute.  Gradually add the confectioners' sugar, Champagne, milk, vanilla, and food coloring; beat until smooth and creamy.
  • Once cake has cooled completely, place bottom layer on a cake plate and spread half the frosting over the top.  Add top layer and cover with frosting. 

Happy Baking,
Star

Tuesday, December 23, 2008

Holiday Parties at Home: Simple steps to Success!

Hello all! I'm sorry it took me a bit longer than I anticipated to get this next post out but last week was crazy for me. I had a huge holiday party for 1000 people, I will be posting photos soon and then the very next day we had our own holiday housewarming for over 100 people. Things were crazy and chaotic and somewhere in the midst of things I learned that my Godfather, Uncle Irving, had passed away. Anyway, both events were extremely successful and went very smooth.

In this post, I'd like to share with you my simple steps to having a successful holiday party in your home. This is my absolute favorite season and there's no better way to celebrate it then to be in good company with great food and decor!

1) Plan ahead! Even if your a last minute Charlie which I myself, even sometimes tend to be, always try and at least map out the direction your going in advance. For my holiday party, I made my menu the same night I made the guest list. This points you in the right direction and prepares you for what to respond with when helpful guests offer to bring someting. Plan your menu, your beverages, your decor and your entertainment as far in advance as you can and this will enable you to have more time for prep as the week of approaches.

2) Accept help! While many do like to do everything they can on their own, help is great too! This year I knew as much as I'd love to do everything on my own it just wasn't feasible with such a large event the day before. Instead, I planned to cook all my crowd pleasing appetizers and platters that I could myself, and get help with mini gourmet sandwiches and salads. I called upon a favorite vendor and immediately felt the relief. I then ordered potato latkes as well from a couple local chefs I know and they aided in taking off some of the pressure. In addition, anyone that offered to bring something I accepted. I asked all my generous guests who offered to please bring a dessert. I also ordered mini cupcakes from Yummy Cupcakes in Burbank and dessert was a huge hit.

3) Appreciate all the details... This year I was full of details! Little things that don't seem that relevant are often times the things your guests will notice most.

I hung ornaments from my chandelier using ribbon, added fabric to my mantles and placed holly around the house for a festive smell. I also made sure to place little snacks such as candy bowls, chocolate covered nuts and raisins in every room for guests to much on. I made sure that the food I was serving had little placecards in front of them to identify what each item was and made sure to have a large variety for my veggie, meat and seafood eaters. I also altered our lighting using twinkle lights, candles and dimmers. This added a real ambiance to the evening.

4) Clean up as you go! Throughout the day while I was prepping and the night while I was entertaining I consistently attempted to put away and clean as much as possible. This prevents a large mess for the end of the night and is very easy. Try and remember the guideline full hands in - full hands out. Anytime your walking in or out of the kitchen or dining area always try and multi-task as you go. The more you can do while completing other tasks along the way, the less you will have to do at the end of the night. It's a great trick to follow and is rather simple too.

5) Have fun! Don't forget to enjoy yourself with your guests. This is always one thing I tend to forget myself, I get so wrapped up in cooking and perfecting everything I tend to place enjoying myself lower on the list. But ultimately, your guests are here for you, it's important to share the night with them. Make sure you allow ample time to complete your entertaining duties and still play a part in the night as well.

So those are my top tips for a successful evening amongst your closest family and friends. I wish you all a happy healthy holiday from my home and into your own. I will try to post a few more times prior to the end of the year