Showing posts with label Recipes. Show all posts

Thursday, August 08, 2013

Star's Favorite Sweets: Meringue with Fresh Berries and Chocolate

As many of you know, I'm a huge fan of meringue (you can find my previous meringue post here).  It is light, fluffy and just the right amount of sweet.  Topped with whipped cream and berries, it is a home run in my book and the perfect summertime treat.  I recently tried out a unique meringue recipe and loved it so much I made it twice in one week!  It oozes with chocolate, cream and fresh berries and is so  SO delicious!  This recipe is quite simple, although a bit time intensive, and is quite the show stopper.  It definitely looks more difficult to make than it actually is.  I promise you will wow your friends with this one!


This recipe is from one of my favorite cookbooks, Apples for Jam, by Tessa Kiros


Meringue:
4 egg whites
3/4 cup superfine sugar
1 teaspoon vanilla extract
2 teaspoons apple cider vinegar
1/2 cup finely chopped walnuts or hazelnuts
1/2 cup finely crushed unsalted crackers (I used saltines)

Topping:
1 cup chopped semisweet chocolate
1 cup heavy whipping cream
1 teaspoon vanilla extract
1 cup fruit (I used a combination of hulled and quartered strawberries, blue berries, and pitted and halved cherries)
confectioners' sugar, to serve

Preheat oven to 250 degrees F.  Cover the bottom of a 9 1/2 inch springform cake pan with a sheet of parchment paper before clipping the side into place.  The paper will stick out of the side, making it easier to remove the meringue later.  Grease the side of the pam (I used non-stick coconut oil spray from Trader Joes).
Whisk the egg whites in a bowl until they lose their foaminess and look like very, thick stiff shaving cream.  Whisk in the sugar bit by it until it is all incorporated, then whisk in the vanilla and the vinegar.  Gently but thoroughly fold in the nuts and crackers.  Spoon into the pan and level the surface, making a slight indent int he middle.
Bake for about 1 1/4 to 1 1/2 hours, until the meringue is lightly golden and coming away from the side of the pan.  Turn off the oven, prop the door just slightly ajar, and leave the meringue inside until it is completely cool.  Take the meringue out of the pan and put it on a serving plate or cake stand.  Remove the paper.
Melt the semisweet chocolate in the top of a double broiler, making sure that the water doesn't touch the bottom of the bowl.  Drizzle over the meringue in a criss-cross pattern and then leave to harden completely.  
Whip the cream with the vanilla until it holds thickly on the beaters.  Dollop onto the meringue, leaving a small border to show off the chocolate.  Dot the berries on top and cover with a gentle shake of confectioners' sugar to serve.  Serves approximately 8 people.  


Give it a try, I promise you won't be disappointed!


Happy Baking,
Star 


Sunday, May 19, 2013

Star's Favorite Sweets: Smore Pops

Summer is right around the corner which has me craving smores!  The combination of gooey marshmallows, creamy chocolate and crunchy graham crackers is just perfect and the ultimate American classic!  I happen to think everything is better on a stick so I thought I'd give smore pops a try.  I must admit they were quite delicious, super simple to make and really pretty!  These smore pops are less messy than camp fire smores and can me made ahead of time which makes them the perfect party treat.

To make these pops, I simply stuck lollypop sticks into marshmallows, dipped them in melted chocolate and rolled the bottoms in crushed graham crackers.  Thats it!  These would be perfect to serve at a Memorial Day BBQ, bridal shower or birthday party.  You could even wrap them up in little cellophane bags, the the with a pretty ribbon and use them as favors.


To make the little flags, I wrapped a bit of washi decorative tape around the tip of the lollypop sticks before I inserted them into the marshmallows.  Washi tape comes in every color an pattern you could imagine so its really easy to customize this treat to your event.  I happen to love the blue and white, especially for this time of year.  Enjoy!!

XOXO,
Star

Wednesday, March 20, 2013

Star's Favorite Sweets: Meringues Topped with Lemon Cream and Fresh Berries

Meringues are melt in your mouth delicious - and topped with berries and cream are the perfect spring time dessert!  I love that I can whip these babies up any time because they require ingredients that I almost always have on hand and they are surprisingly simple to prepare.  Once baked, meringues are crunchy on the outside and bit chewy in the middle.  They are delicious by themselves as a fat free, low calorie snack or dessert; however, I prefer them topped with whipped cream and fresh fruit. Using my recipe you can make either one one large meringue, four individual dessert size ones or about fifteen minis that can be easily popped into your mouth :)  This recipe can also be easily doubled.

Ingredients
Meringues
2 egg whites
1/2 cup sugar
1/2 teaspoon vanilla bean paste (or vanilla extract)
A quarter teaspoon of white vinegar

Lemon/Berry Topping
1 cup heavy whipping cream
3 tablespoons of lemon curd
1 1/2 cups fresh mixed berries
a bit of sugar

Directions
Preheat the oven to 250 degrees.  If making small meringues, use a drinking glass to trace circles onto a piece of parchment paper (if making a large meringue, use a bowl).  Flip the parchment paper over so that the circles are facing down but you can still see them through (you don't want ink on your meringues!) and place the parchment paper on a cookie sheet.

For the meringue, put the egg whites into a wide bowl and using a hand mixer, whisk until they are white, firm and glossy.  Add a third of the sugar and continue whisking until they are stiffer then add another third of the sugar.  Continue mixing for another minute or so.  Once the meringue is very stiff, add the remaining sugar, vanilla, and vinegar.

Spoon the meringue onto the parchment paper, using your circles as guides.  Make a slight indentation in the center of each.  Place in the preheated oven for about 35 minutes, then rotate the pan and bake for another 30 minutes or until they are firm.  Turn off the oven and leave them inside for about 30 minutes with the door slightly ajar before removing to cool completely.  Meringues must be cooled gradually; if they cool to quickly, they will deflate and crack.

To make the lemon cream simply whip the heavy cream until it reaches your desired consistency and stir in the lemon curd.  Add a bit of powdered sugar if you prefer a sweeter cream.  
I heated my berries for for a few minutes with about a tablespoon of sugar which created a bit of a sauce, but you could skip this step and leave the berries just as they are :)

Once the meringues have cooled, pile them high with the lemon cream and berries.  Enjoy!!


Happy Baking,

Star

Wednesday, February 13, 2013

Star's Favorite Sweets: Dark Chocolate Love Cookies

Today I am sharing with you one of my new favorite cookie recipes: The Perfect Dark Chocolate Sugar Cookie.  This recipe comes courtesy of Rosie who is the author of one of my favorite blogs, Sweetapolita.  This blog is constantly inspiring me to bake.  My mouth waters just looking at the pictures of her amazing sweet concoctions!  The Perfect Dark Chocolate Sugar Cookie recipe was posted just before the Holidays and I knew I had to try it.  Adding chocolate to anything, even a traditional sugar cookie recipe, is bound to produce delicious results, right?  Let me tell you, it did!  These cookies were such a hit at my annual holiday cookie exchange party that I decided to make them again for Valentine's Day.  My husband loves having home baked cookies out on the counter so I thought I'd surprise him with these love cookies for Valentine's Day.

I must admit, this recipe is quite tedious as it has various steps involving chilling dough, rolling it out, re chilling, cutting shapes, re chilling, etc. but let me tell you, it is well worth it and all of the steps really do matter!  If the steps are followed correctly, this recipe produces the most amazing dark chocolate sugar cookie (which must be why Rosie named them "The Perfect Dark Chocolate Sugar Cookie").  These cookies keep their shape and are an awesome blank canvas for decorating!  They are firm enough to hold together nicely when you pick them up but have a bit of chewiness when you bite into them.  You'll thank me for this one!

Ingredients

      6 cups all-purpose flour, sifted
      1-1/4 cups dark cocoa powder
      1 teaspoon salt
      2 cups (4 sticks) unsalted butter, softened
      2 cups granulated sugar
      1 cup light brown sugar
      3 eggs, cold
      2 teaspoons pure vanilla extract

Instructions

  1. 1. In large bowl, sift together flour, cocoa powder and salt. Set aside.
  2. 2. In an electric mixer fitted with the paddle attachment, cream butter and sugars until fluffy and pale, about 5 minutes. Beat in eggs until just combined.
  3. 3. Add flour mixture and mix on low speed until thoroughly combined. Add vanilla and blend.
  4. 4. Remove 1/2 of dough from bowl, make a ball, and place on a large piece of plastic wrap on counter.Wrap the sides of wrap over the ball, then press down with the palm of your hand and make a disc about 2" thick. Finish wrapping the disc with the plastic wrap. Repeat with 2nd half of dough. Chill both discs of dough for about 45 minutes.
  5. 5. Remove one disc and remove plastic wrap. Place on top of a large piece of parchment paper (I use a silicone rolling mat underneath to ensure it doesn't slip while rolling, but you can even dampen counter so the parchment sticks a bit.), then place two 1/4" wooden dowels on either side of your dough, then another sheet of parchment paper.
  6. 6. Roll dough (this will require a bit of elbow grease for the first few minutes until it softens up a bit) so it's flush with dowels--they will ensure that your dough is even thickness.
  7. 7. Preheat your oven to 325° F. Slide your parchment paper and dough onto a board, then place in refrigerator for about 15 minutes.
  8. 8. Remove from fridge, and cut your shapes using the cutters of your choice, placing them on a baker's half sheet lined with a silicone baking mat (or parchment), with 2" clearance around each one and the edge of sheet. Place sheet with cookies into freezer for 15 minutes before baking. Bake until cookie edges are just crisp, about 16 minutes.
  9. 9. Cool sheets on wire racks for 10 minutes, then gently remove cookies and place on wire racks to finish cooling.

Photos courtesy of Sweetapolita


Happy Baking!

-Star

Thursday, August 30, 2012

Star's Favorite Things: Vanilla and Toasted Coconut Limeade

It has been unbelievably hot lately which has me dreaming of turquoise waters, sand between my toes, and a refreshing drink in my hand.  Unfortunately, I don't have a tropical vacation planned so this past weekend I thought I'd create my own bit paradise in a glass: Vanilla and Toasted Coconut Limeade.  The combination of coconut and lime oozes exotic, tropical, summertime, yumminess!

The scent of this beverage is divine and the subtle creamy white of the coconut and the electric green of the lime look so pretty together.  My husband thought this drink was delicious but thought it would be even better with some tequila in it.  He ended up with a Vanilla and Toasted Coconut Margarita!  I must say the tequila was a nice addition.  I think it would also be pretty tasty with some coconut flavored rum.

This beverage is the perfect signature mocktail or cocktail for your summer wedding or soirée.  I chose to serve mine in little mason jars with glass straws but I think they would be adorable served with a vintage paper straw (a gray one would be adorable).  I adore vintage paper straws, for more on them check out this previous post.


Recipe 
Makes approximately 8 beverages

1 and 1/4 cup lime juice (about 10 limes), fresh squeezed
1 additional lime cut into lime wheels (for garnish)1 and 1/4 cup sweet coconut flakes, packed
2 and 1/2 cups hot water
2 cups coconut water 
1/3 cup agave nectar
1/2 vanilla bean, scraped (or 1 teaspoon vanilla paste)


Instructions 


Preheat oven to 350 F.  Lightly toast the coconut on a baking sheet, thinly spread out, for about 5-7 minutes, stirring once halfway through.  Reserve 1/4 cup of the toasted coconut to garnish your drinks.  Juice the limes and pour the lime juice into a pitcher.  Put about half the used lime halves into a bowl, along with the coconut and vanilla bean (or vanilla paste), and cover with 2 cups of hot water.  Let it sit for about 5 minutes.  Remove the limes and let the coconut, vanilla bean, and water stand for another 5-10 minutes.  
Strain the coconut and vanilla mixture into the pitcher with lime juice.  Discard the coconut and vanilla bean.
Add the coconut water and agave (adding more or less agave to taste).  Stir until incorporated. Chill in the fridge until ready to serve.  Give the limeade a quick stir before serving.  Serve over ice and garnish with the reserved toasted coconut and a lime wheel.  Feel free to add tequila, rum, or vodka to this delicious beverage :)
Recipe adapted from The Kitchy Kitchen

Enjoy,
Star

Tuesday, July 17, 2012

Star's Favorite Sweets: Blue Moon Cupcakes

The weather is warming up, summer is in full bloom and BBQ season calls for fun recipes!  I'm not normally a beer drinker but I really enjoy a cold Blue Moon this time of year.  When I came across this recipe for Blue Moon Cupcakes on Pinterest, I knew I had to try it!  These little cakes are exactly what they sound like: yummy cupcakes that look and taste like delicious Blue Moon Belgian Ale. The cake has a slight citrus flavor and you can taste a hint of the wheat in the background from the beer.  The frosting is absolutely delicious!  It is light and fluffy, just like the foam on top of the beer.  The frosting truly is my favorite part of the cupcake and I plan to use it for many various types of cupcakes in the future.  This is such a fun recipe - I just had to share it with you!  

I have now taken these cupcakes to a few different events and they are always a crowd pleaser.  They are a great treat to whip up for summer time events and I can guarantee that the men in your life will be in awe!  Make sure you bring along some beers (Blue Moons, of course) to complete the experience!


Isn't this a beautiful cupcake?!  It just begs to be eaten... and washed down with a cold Blue Moon!


Blue Moon Cupcakes
3/4 c unsalted butter, softened
1 3/4 c sugar
2 1/2 c flour
2 1/2 tsp baking powder
1/2 tsp salt
3 eggs, room temperature
1 tsp vanilla
2 drops red food coloring
10 drops yellow food coloring
1/2 tsp orange zest
1 c Blue Moon beer
1/4 c milk
Frothy White Frosting [recipe follows]
small orange slices, for garnish

Directions:
1. Line 24 cupcake trays with liners. [Use white liners if you can, they become translucent during baking and really sell the mini Blue Moon image]. In a medium bowl, mix together flour, baking power and salt.
2. In a large bowl beat butter on medium speed for 30 seconds. Add sugar a little bit at a time, beating well. Once it's all added beat for 2 more minutes.
3. Add eggs, beating after each.
4. Add vanilla, food coloring and orange zest and beat.
5. Mix beer and milk in a measuring cup. Alternatively add beer / milk mixture and flour mixture to butter mixture in the large bowl, beating after each. End on the flour mixture.
6. Fill cupcake liners 2/3 full. Bake for 18 minutes at 375 degrees F until cupcakes are golden and a toothpick inserted in center comes out clean.
7. Once cool, frost each cupcake with a generous amount of frosting. Just before serving, garnish each with a small orange slice.

Frothy White Frosting
2 egg whites, room temperature
1 tsp vanilla extract
1 tbsp orange juice
1 c sugar
1/4 tsp cream of tartar
1/3 c water

Directions:
1. In a saucepan, mix sugar, water and cream of tartar. Cook on medium heat until sugar is dissolved and mixture is bubbly.
2. In a large bowl, beat egg whites, vanilla and orange juice until soft peaks form. Slowly add hot sugar mixture, beating continuously. Beat for 7 minutes until stiff peaks form.

Recipe courtesy of Miss Make


Happy Baking,
Star

Saturday, April 14, 2012

DIY with Star: Rose Infused Sugar Cubes/Hearts

I'd like to share with you one of my fun new kitchen purchases: rose water.  I've been drinking a lot of tea lately and have been enjoying a certain rose flavored loose black tea my mother gave me over the holidays.  Unfortunately, I've run out of it and plain black tea lacks the rose flavor I've come to love.  While perusing the Internet recently, I came across a bottle of French food grade rose water.  I purchased it with the intention to add it to my tea.  I've seen recipes for homemade sugar cubes on Pinterest and thought rose flavored sugar cubes would be the perfect addition to my tea.  Alejandra Ramos, author of food blog Always Order Dessert has posted a rose water infused sugar cube recipe which I used as my base.

Photos courtesy of Always Order Dessert

Here is the recipe:

Homemade Flavored Sugar Cubes

Ingredients

1.5 cups granulated white sugar
2 teaspoons flavoring such as rosewater, orange blossom water, or fresh lemon juice
2 teaspoons plain water 
1-2 drops food coloring of your choice (I used 3 drops red to get this bright pink color, 2 drops yellow for the yellow, and 2-3 drops each red and blue for the purple)

Method
Pour the sugar into a large bowl. In a separate small cup, combine the rosewater, water, and food coloring. Pour the rosewater mixture into the sugar and mix thoroughly until evenly combined. The texture should feel and look like wet sand with a bit of fluff to it. If the mixture is too wet, add granulated sugar by the tablespoon until the texture is right (this might be the case if you live in a very humid climate). If it's too dry, add a bit more water. 
Pour the sugar onto a parchment-lined baking sheet and use your hands to pack into a flat, compact rectangle. Use a bench scraper or knife to cut the block across in rows and then again in perpendicular rows, creating approximately 1/2 inch cubes. Leave the cubes to dry for about 30 minutes, before separating gently and letting dry an additional 20 minutes. 

To make molded cubes: pack the wet sugar mixture tightly into a small (about 1" to 1.5") cookie cutter on a piece of parchment paper. Gently lift the cutter off and let the sugar dry for 30 minutes before moving onto a drying rack and letting dry on the reverse side. Repeat for each cube until completely dry (about an hour).
When completely dry (you should be able to squeeze a cube gently without it breaking apart, you can serve in a regular sugar bowl, or store in an air-tight container.

My DIY Tutorial

I made the cubes as well as molded hearts and both turned out great and were so fun to make!  Below is my tutorial for the molded hear shaped ones (my method differed slightly from the above).

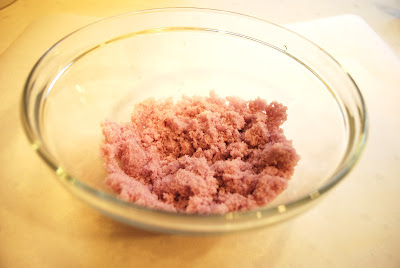
I started with the ingredients listed above (I mixed red and blue food coloring to get the purple color below).  Once mixed together, it was the consistency of wet sand:


Rather than packing the sugar into the cutter, I pressed it down on a sheet of parchment paper and used the cutter to cut out heart shapes - like you would sugar cookies:


I let them dry for about 30 minutes, then flipped them and let them dry over night.

These little babies were delicious in my tea and added just the right amount of rose flavor.  If you try this recipe with rose water, make sure to start with just a bit as a little goes a long way and the flavor can quickly become overpowering.  Alejandra Ramos, of food Always Order Dessert suggests adding a few to a glass of Champagne or white wine which I think sounds lovely!  I recently made delicious vanilla cupcakes with vanilla butter cream (recipe to come) and topped them with these sugar hearts.  They were a big hit!


Think of the color and flavor combinations you could try!  These cubes or hearts would be so cute at a wedding, shower or just for you for your afternoon tea.  I think I may have to try making these with orange blossom water or lavender syrup next!

Enjoy,
Star

Saturday, March 10, 2012

Star's Favorite Things: Pink Champagne Cake

Today I'd like to share with you one of my new favorite recipes: Pink Champagne Cake.  This cake has quickly become one the most delicious and beautiful cakes I've ever had... I don't know if it is the light fluffy texture, the beautiful pink color, or the amazing aroma with just a hint of Champagne. This beautiful cake is It is both elegant and unexpected.  Any way you slice it, Pink Champagne Cake is the perfect dessert for a bridal shower, anniversary, Valentine's Day or New Year's Eve!

Photo courtesy of Booze Cakes by Krystina Castella and Terry Lee Stone

This recipe comes from the book "Booze Cakes" by Krystina Castell and Terry Lee Stone which was given to me by a friend for my last birthday.  This fun book is filled with unique dessert recipes and "booze" is incorporate in every single one!  Who knew the hard stuff could liven up so many different baked goods!?!


Photo courtesy of Booze Cakes by Krystina Castella and Terry Lee Stone
You can buy this book on Amazon

Each recipe incorporates a different type of alcohol to create a mouth watering dessert... from Tipsy Tiramisu, to Strawberry Daiquiri Shortcakes, to Blue Hawaii Pineapple Upside-Down Cupcakes to Rum-and-Coke Whoopie Pies!  ... But, the Pink Champagne Cake happens to be my favorite! According to the authors of the book, "Traditionally, a Champagne Cake is a white cake layered with rum, Bavarian or whipped cream filling, pink buttercream icing - and not an ounce of Champagne! This recipe lightens the crumb by including a splash of bubbly".  

Champagne is appropriate at any celebration, whether in a glass or in a cake!  This is a recipe you must try (with a glass of Champagne in your hand of course)!

RECIPE

INGREDIENTS:
PINK CHAMPAGNE CAKE
3 cups all-purpose flour
3 tsp. baking powder
1/2 tsp. salt
1 cup (2 American sticks) unsalted butter
2 cups sugar
1 tsp. vanilla extract
6 egg whites
A few drops of red food coloring (the cake doesn't appear to be colored in the photo, so I would consider this to be optional)
2 cups Champagne

PINK CHAMPAGNE FROSTING
3/4 cup (1-1/2 American sticks) unsalted butter
4 cups confectioners' (icing) sugar
1/2 cup Champagne
1/4 cup whole milk
1 Tblsp. vanilla extract
A few drops of red food coloring

INSTRUCTIONS:
  • Preheat oven to 350 F/ 180 C.  Grease and flour two 9-inch round cake pans.
  • In a bowl, combine flour, baking powder, and salt; set aside.  In a mixing bowl, beat butter and sugar 3-5 minutes, or until light and fluffy.  Add vanilla and beat in egg whites one at a time.
  • Mix in food coloring.  Beat in flour mixture and Champagne in three alternating additions, starting and ending with flour to prevent curdling.  Pour batter into pans and bake 35 minutes, or until a knife inserted in the center comes out clean.
  • For the frosting: In a mixing bowl, beat butter 1 minute.  Gradually add the confectioners' sugar, Champagne, milk, vanilla, and food coloring; beat until smooth and creamy.
  • Once cake has cooled completely, place bottom layer on a cake plate and spread half the frosting over the top.  Add top layer and cover with frosting. 

Happy Baking,
Star

Tuesday, January 31, 2012

Star's Favorite Things: "Buttered-Popcorn Ice Cream Sundae" recipe

Hello All.  I've been on a popcorn kick lately and recently tried the Buttered-Popcorn Ice Cream Sundae recipe I came across in a few months ago in my Bon Appetit magazine.  It was absolutely fabulous - the perfect combination of sweet and salty!  If you are a popcorn/carmel corn/kettle corn fan, this recipe is a must try.  The ice cream is flavored with real buttered popcorn and topped with carmel sauce, whipped cream and chocolate covered kettle corn!

One thing to note, you do have to have an ice cream maker for this recipe.
Photo courtesy of Bon Appetit

The recipe called for peanut butter-chocolate halvah (the recipe was included); however, I skipped the halvah and topped mine with this delicious Cocoa Drizzled Kettle Corn I'd picked up from Trader Joe's.

Photo courtesy of Trader Joe's

Here is the recipe:

Caramel Sauce Ingredients

1 cup sugar

2 tablespoons light corn syrup

1/8 teaspoon cream of tartar

2 tablespoons (1/4 stick) butter

1/2 cup heavy cream

1 teaspoon vanilla extract

1/4 teaspoon kosher salt

Buttered-Popcorn Ice Cream Ingredients

2 cups popped popcorn

1 1/2 tablespoons unsalted butter, melted

1 teaspoon kosher salt, divided

2 cups whole milk

2 cups heavy cream

1/4 cup light corn syrup

5 tablespoons sugar, divided

8 large egg yolks


Caramel Sauce Preparation

Combine sugar, corn syrup, cream of tartar, and 1/4 cup water in a medium saucepan. Stir over medium-low heat until sugar dissolves. Increase heat and cook without stirring, occasionally swirling pan and brushing down sides with a wet pastry brush, until dark amber in color, about 7 minutes.  Remove from heat; immediately add butter and stir until melted. Slowly add cream (mixture will bubble vigorously). Add vanilla and salt; whisk until smooth. 
DO AHEAD: Can be made 1 month ahead. Let cool completely. Cover sauce and chill. Rewarm slightly before using.

Buttered-Popcorn Ice Cream Preparation

Set a strainer over a large bowl; set aside. Place popcorn in another large bowl. Drizzle butter over and sprinkle with 1/2 tsp. salt; toss to coat. Add milk and cream; cover and steep for 10 minutes. Stir in corn syrup and 1 Tbsp. sugar. Working in batches, purée popcorn mixture in a blender until smooth. Transfer to a large saucepan and bring to a simmer over medium heat.  Using an electric mixer, beat yolks, remaining 4 Tbsp. sugar, and remaining 1/2 tsp. salt in a large bowl until thick ribbons form. Gradually whisk hot popcorn mixture into yolk mixture. Return to saucepan and cook over medium-low heat, stirring constantly with a wooden spoon, until custard is slightly thickened, your finger leaves a path when drawn across the back of a spoon, and an instant-read thermometer registers 175°, 3–4 minutes. Pour through strainer. Cover and chill overnight.  Process in an ice cream maker according to manufacturer's instructions. Transfer to a container, cover, and freeze. 
DO AHEAD: Can be made 2 days ahead. Keep frozen.

Assembly

Spoon some caramel sauce into tall, decorative glasses or serving bowls. Add 2 scoops buttered-popcorn ice cream. Drizzle more caramel sauce over. Sprinkle some Cocoa Covered Kettle Corn (or halvah) over. Top with a spoonful of whipped cream. 


I hope you enjoy!

Best,
Star

Friday, November 25, 2011

Star's Favorite Things: Holiday Cocktail "Eggnog-Arita"


Hello everyone, I hope you all had a wonderful Thanksgiving and are enjoying precious time with family and friends.  Well, it's Black Friday and after all that shopping I bet you could use a cocktail!  I know I sure could, but that is something I’ll have to skip until the bun is out of the oven.  As I’ve mentioned, I subscribe to a number of food magazines and although they all have listed recipes for holiday cocktails, one in particular caught my eye.  Food Network Magazine’s “Eggnog-Arita” created by Elizabeth Falkner.  Out of the entire bunch, this is the one I really wish I could try!  I love homemade Egg Nog (not the stuff from a carton), the real thing!  This looks like an amazing recipe for a twist on the old classic, and oh so pretty.  Please try this holiday cocktail and let me know how it is so I can live vicariously through you J

Photo courtesy of Food Network

EGGNOG-ARITAS
MAKES: 8 drinks

FOR THE CREAM ANGLAISE
2 cups half-and-half
½ whole nutmeg, crushed with a heavy pan
1 vanilla bean, split lengthwise and seeds scraped out
6 large egg yolks
½ cup sugar

FOR THE COCKTAILS
½ cup sugar
½ teaspoon freshly grated nutmeg
2 ounces brandy
2 ounces rum
2 ounces burbon

1.     Make the crème anglaise: Combine the half-and-half, crushed nutmeg, and vanilla pod and seeds in a medium saucepan and bring just to a boil over medium heat.  Remove the heat and let steep 5 minutes.
2.     Wisk the egg yolks and sugar in a bowl.  Slowly whisk in the warm half-and-half mixture, then pour the egg mixture into the saucepan and cook over medium heat, stirring constantly, until the crème anglaise just begins to thicken, about 10 minutes.  Strain and refrigerate until cold, about 4 hours.
3.     Make the cocktails: Combine the sugar and grated nutmeg on a plate.  Dip the rims of 8 cocktails in water, then the sugar mixture.  Combine half each the crème anglaise, brandy, rum and bourbon in a cocktail shaker with ice.  Shake well and strain into 4 glasses.  Repeat to make 4 more cocktails.
  
      Happy Holidays,
                Star
Tuesday, November 23, 2010

Totally Delish Thanksgiving Recipe: Herb-Roasted Turkey with Apple Cider Gravy

So it's not very often that we post recipes on our blog, after all we design and produce events for the most part. However, planning life's celebrations does include some of the planning at home for the holidays. My favorite is definitely Thanksgiving!

For that, today we are posting quite possibly the greatest turkey recipe ever! Not exaggerating here people, this recipe is extraordinary! It actually requires days of prep, thus today is the day to start if your interested in trying something new this year. Not sure how I make the time to do it, but I have and I will continue to, as it really is totally worth it.

After making this recipe for the past 3 years, receiving all the rave reviews from family and friends, all over my amazing skill to pretty much follow the Bon Appetit recipe, I've decided to share it. Now you can enjoy all the compliments that follow this bird and eat the best turkey ever, all in the same night.

So... without further adieu, here is my all-time favorite recipe from the lovely Epicurious website.

Herb-Roasted Turkey with Apple Cider Gravy


Brining the turkey in the refrigerator for two days ensures an incredibly moist result. We do not recommend stuffing brined turkeys because the brine can make the stuffing too salty. A do-ahead gravy base eliminates last-minute stirring and thickening. Look for fresh bay leaves in the produce section.

Yield: Makes10 servings

Ingredients

Brining
8 quarts cold water
2 cups coarse kosher salt
8 large fresh or dried bay leaves
2 tablespoons black peppercorns
2 tablespoons whole allspice
1 16- to 17-pound turkey; giblets removed, neck reserved

Herb butter and gravy

3 tablespoons minced fresh Italian parsley
3 tablespoons minced fresh thyme
3 tablespoons minced fresh sage
3 tablespoons minced fresh marjoram
1 teaspoon minced fresh rosemary
1 teaspoon ground nutmeg
3/4 cup (1 1/2 sticks) unsalted butter, room temperature

4 cups low-salt chicken broth
2 cups apple cider
3 tablespoons all purpose flour
1/2 cup whipping cream
2 tablespoons Calvados (apple brandy) or other brandy

Roasting

2 large Granny Smith apples, quartered, cored
2 large onions, quartered

1 cup apple cider

Preparation
To brine the turkey:

Line extra-large pot or bowl with two 13-gallon (or larger) plastic bags, 1 inside the other. Combine 1 quart water, salt, bay leaves, peppercorns, and allspice in large saucepan. Stir over medium heat until salt dissolves. Remove from heat. Add 1 quart cold water and cool to lukewarm. Pour into plastic bags; mix in remaining 6 quarts water. Wrap turkey neck and refrigerate. Submerge turkey in brine to cover completely, gathering bags tightly to eliminate any air; tie bags closed. Refrigerate turkey in brine in pot at least 18 hours and up to 20 hours.

Line large roasting pan with 4 layers of paper towels. Remove turkey from brine and drain well; discard brine. Place turkey in prepared pan. Cover with plastic wrap and refrigerate overnight.

For herb butter and gravy:


Mix parsley, thyme, sage, marjoram, rosemary, and nutmeg in small bowl. Transfer 1/4 cup herb mixture to small bowl; mix in 1/2 cup butter.

Combine broth and apple cider in heavy large saucepan. Boil until reduced to 3 cups, about 20 minutes. Pour broth reduction into bowl. Melt remaining 1/4 cup butter in same saucepan over medium-high heat. Add flour; stir 1 minute. Whisk in broth reduction, then cream, Calvados, and remaining herb mixture. Bring to boil; reduce heat to medium-low and simmer until gravy base is thickened and reduced to 2 3/4 cups, whisking often, about 20 minutes. Cool gravy base slightly. (Gravy base and herb butter can be made 2 days ahead. Cover and chill.)

To roast the turkey:

Position rack in bottom third of oven and preheat to 350°F. Remove turkey from roasting pan; drain any accumulated juices from main cavity. Discard paper towels from roasting pan. Melt herb butter in small saucepan over medium heat. Brush bottom of roasting pan with some of herb butter. Return turkey to prepared pan. Tuck wing tips under; tie legs together loosely to hold shape. Place some apple quarters and onion quarters in main cavity. Brush remaining herb butter over turkey; sprinkle with pepper. Scatter remaining apples and onions around turkey in pan. Add reserved turkey neck to pan.

Roast turkey 1 hour. Baste with 1/2 cup apple cider. Roast turkey 30 minutes. Baste with remaining 1/2 cup cider. Roast turkey until thermometer inserted into thickest part of thigh registers 175°F, basting turkey every 30 minutes with pan juices and covering breast loosely with foil if browning too quickly, about 2 hours longer (3 1/2 hours total). Transfer turkey to platter; let stand at least 30 minutes before carving (internal temperature will rise 5 to 10 degrees).

Discard apples, onions, and turkey neck from pan. Pour pan juices into large glass measuring cup; spoon off fat from surface. Pour degreased juices into gravy base and bring to boil over medium-high heat, whisking occasionally. Boil until gravy thickens enough to coat spoon and is reduced to 3 1/2 cups, about 15 minutes. Season gravy to taste with pepper.

Serve turkey with gravy.

So there you have it, my secret weapon for the holidays is officially out.

Couple quick things I always modify with this recipe...
* I always make double herb butter and place it under the skin of the bird, before it goes in the oven.
* I always double the gravy recipe so you have extra for your guests.
* I always baste with extra cider after that first initial hour.
* I always cook my bird at 500 degrees for the first half hour to get a nice color than I drop it down to the 350 degrees. If during the cooking process, it becomes to brown, you can always cover it with foil over the breast portion.
* Lastly, I always serve with my signature cranberry sauce...

Happy Cooking!