Showing posts with label sweets. Show all posts

Thursday, August 08, 2013

Star's Favorite Sweets: Meringue with Fresh Berries and Chocolate

As many of you know, I'm a huge fan of meringue (you can find my previous meringue post here).  It is light, fluffy and just the right amount of sweet.  Topped with whipped cream and berries, it is a home run in my book and the perfect summertime treat.  I recently tried out a unique meringue recipe and loved it so much I made it twice in one week!  It oozes with chocolate, cream and fresh berries and is so  SO delicious!  This recipe is quite simple, although a bit time intensive, and is quite the show stopper.  It definitely looks more difficult to make than it actually is.  I promise you will wow your friends with this one!


This recipe is from one of my favorite cookbooks, Apples for Jam, by Tessa Kiros


Meringue:
4 egg whites
3/4 cup superfine sugar
1 teaspoon vanilla extract
2 teaspoons apple cider vinegar
1/2 cup finely chopped walnuts or hazelnuts
1/2 cup finely crushed unsalted crackers (I used saltines)

Topping:
1 cup chopped semisweet chocolate
1 cup heavy whipping cream
1 teaspoon vanilla extract
1 cup fruit (I used a combination of hulled and quartered strawberries, blue berries, and pitted and halved cherries)
confectioners' sugar, to serve

Preheat oven to 250 degrees F.  Cover the bottom of a 9 1/2 inch springform cake pan with a sheet of parchment paper before clipping the side into place.  The paper will stick out of the side, making it easier to remove the meringue later.  Grease the side of the pam (I used non-stick coconut oil spray from Trader Joes).
Whisk the egg whites in a bowl until they lose their foaminess and look like very, thick stiff shaving cream.  Whisk in the sugar bit by it until it is all incorporated, then whisk in the vanilla and the vinegar.  Gently but thoroughly fold in the nuts and crackers.  Spoon into the pan and level the surface, making a slight indent int he middle.
Bake for about 1 1/4 to 1 1/2 hours, until the meringue is lightly golden and coming away from the side of the pan.  Turn off the oven, prop the door just slightly ajar, and leave the meringue inside until it is completely cool.  Take the meringue out of the pan and put it on a serving plate or cake stand.  Remove the paper.
Melt the semisweet chocolate in the top of a double broiler, making sure that the water doesn't touch the bottom of the bowl.  Drizzle over the meringue in a criss-cross pattern and then leave to harden completely.  
Whip the cream with the vanilla until it holds thickly on the beaters.  Dollop onto the meringue, leaving a small border to show off the chocolate.  Dot the berries on top and cover with a gentle shake of confectioners' sugar to serve.  Serves approximately 8 people.  


Give it a try, I promise you won't be disappointed!


Happy Baking,
Star 


Sunday, May 19, 2013

Star's Favorite Sweets: Smore Pops

Summer is right around the corner which has me craving smores!  The combination of gooey marshmallows, creamy chocolate and crunchy graham crackers is just perfect and the ultimate American classic!  I happen to think everything is better on a stick so I thought I'd give smore pops a try.  I must admit they were quite delicious, super simple to make and really pretty!  These smore pops are less messy than camp fire smores and can me made ahead of time which makes them the perfect party treat.

To make these pops, I simply stuck lollypop sticks into marshmallows, dipped them in melted chocolate and rolled the bottoms in crushed graham crackers.  Thats it!  These would be perfect to serve at a Memorial Day BBQ, bridal shower or birthday party.  You could even wrap them up in little cellophane bags, the the with a pretty ribbon and use them as favors.


To make the little flags, I wrapped a bit of washi decorative tape around the tip of the lollypop sticks before I inserted them into the marshmallows.  Washi tape comes in every color an pattern you could imagine so its really easy to customize this treat to your event.  I happen to love the blue and white, especially for this time of year.  Enjoy!!

XOXO,
Star

Wednesday, March 20, 2013

Star's Favorite Sweets: Meringues Topped with Lemon Cream and Fresh Berries

Meringues are melt in your mouth delicious - and topped with berries and cream are the perfect spring time dessert!  I love that I can whip these babies up any time because they require ingredients that I almost always have on hand and they are surprisingly simple to prepare.  Once baked, meringues are crunchy on the outside and bit chewy in the middle.  They are delicious by themselves as a fat free, low calorie snack or dessert; however, I prefer them topped with whipped cream and fresh fruit. Using my recipe you can make either one one large meringue, four individual dessert size ones or about fifteen minis that can be easily popped into your mouth :)  This recipe can also be easily doubled.

Ingredients
Meringues
2 egg whites
1/2 cup sugar
1/2 teaspoon vanilla bean paste (or vanilla extract)
A quarter teaspoon of white vinegar

Lemon/Berry Topping
1 cup heavy whipping cream
3 tablespoons of lemon curd
1 1/2 cups fresh mixed berries
a bit of sugar

Directions
Preheat the oven to 250 degrees.  If making small meringues, use a drinking glass to trace circles onto a piece of parchment paper (if making a large meringue, use a bowl).  Flip the parchment paper over so that the circles are facing down but you can still see them through (you don't want ink on your meringues!) and place the parchment paper on a cookie sheet.

For the meringue, put the egg whites into a wide bowl and using a hand mixer, whisk until they are white, firm and glossy.  Add a third of the sugar and continue whisking until they are stiffer then add another third of the sugar.  Continue mixing for another minute or so.  Once the meringue is very stiff, add the remaining sugar, vanilla, and vinegar.

Spoon the meringue onto the parchment paper, using your circles as guides.  Make a slight indentation in the center of each.  Place in the preheated oven for about 35 minutes, then rotate the pan and bake for another 30 minutes or until they are firm.  Turn off the oven and leave them inside for about 30 minutes with the door slightly ajar before removing to cool completely.  Meringues must be cooled gradually; if they cool to quickly, they will deflate and crack.

To make the lemon cream simply whip the heavy cream until it reaches your desired consistency and stir in the lemon curd.  Add a bit of powdered sugar if you prefer a sweeter cream.  
I heated my berries for for a few minutes with about a tablespoon of sugar which created a bit of a sauce, but you could skip this step and leave the berries just as they are :)

Once the meringues have cooled, pile them high with the lemon cream and berries.  Enjoy!!


Happy Baking,

Star

Wednesday, February 13, 2013

Star's Favorite Sweets: Dark Chocolate Love Cookies

Today I am sharing with you one of my new favorite cookie recipes: The Perfect Dark Chocolate Sugar Cookie.  This recipe comes courtesy of Rosie who is the author of one of my favorite blogs, Sweetapolita.  This blog is constantly inspiring me to bake.  My mouth waters just looking at the pictures of her amazing sweet concoctions!  The Perfect Dark Chocolate Sugar Cookie recipe was posted just before the Holidays and I knew I had to try it.  Adding chocolate to anything, even a traditional sugar cookie recipe, is bound to produce delicious results, right?  Let me tell you, it did!  These cookies were such a hit at my annual holiday cookie exchange party that I decided to make them again for Valentine's Day.  My husband loves having home baked cookies out on the counter so I thought I'd surprise him with these love cookies for Valentine's Day.

I must admit, this recipe is quite tedious as it has various steps involving chilling dough, rolling it out, re chilling, cutting shapes, re chilling, etc. but let me tell you, it is well worth it and all of the steps really do matter!  If the steps are followed correctly, this recipe produces the most amazing dark chocolate sugar cookie (which must be why Rosie named them "The Perfect Dark Chocolate Sugar Cookie").  These cookies keep their shape and are an awesome blank canvas for decorating!  They are firm enough to hold together nicely when you pick them up but have a bit of chewiness when you bite into them.  You'll thank me for this one!

Ingredients

      6 cups all-purpose flour, sifted
      1-1/4 cups dark cocoa powder
      1 teaspoon salt
      2 cups (4 sticks) unsalted butter, softened
      2 cups granulated sugar
      1 cup light brown sugar
      3 eggs, cold
      2 teaspoons pure vanilla extract

Instructions

  1. 1. In large bowl, sift together flour, cocoa powder and salt. Set aside.
  2. 2. In an electric mixer fitted with the paddle attachment, cream butter and sugars until fluffy and pale, about 5 minutes. Beat in eggs until just combined.
  3. 3. Add flour mixture and mix on low speed until thoroughly combined. Add vanilla and blend.
  4. 4. Remove 1/2 of dough from bowl, make a ball, and place on a large piece of plastic wrap on counter.Wrap the sides of wrap over the ball, then press down with the palm of your hand and make a disc about 2" thick. Finish wrapping the disc with the plastic wrap. Repeat with 2nd half of dough. Chill both discs of dough for about 45 minutes.
  5. 5. Remove one disc and remove plastic wrap. Place on top of a large piece of parchment paper (I use a silicone rolling mat underneath to ensure it doesn't slip while rolling, but you can even dampen counter so the parchment sticks a bit.), then place two 1/4" wooden dowels on either side of your dough, then another sheet of parchment paper.
  6. 6. Roll dough (this will require a bit of elbow grease for the first few minutes until it softens up a bit) so it's flush with dowels--they will ensure that your dough is even thickness.
  7. 7. Preheat your oven to 325° F. Slide your parchment paper and dough onto a board, then place in refrigerator for about 15 minutes.
  8. 8. Remove from fridge, and cut your shapes using the cutters of your choice, placing them on a baker's half sheet lined with a silicone baking mat (or parchment), with 2" clearance around each one and the edge of sheet. Place sheet with cookies into freezer for 15 minutes before baking. Bake until cookie edges are just crisp, about 16 minutes.
  9. 9. Cool sheets on wire racks for 10 minutes, then gently remove cookies and place on wire racks to finish cooling.

Photos courtesy of Sweetapolita


Happy Baking!

-Star

Thursday, December 13, 2012

Featured Wedding: Jessica + David at Saint Sophia's Cathedral & Vibiana


Jessica and David tied the knot on October 20, 2012 in a stunning ceremony at Saint Sophia Cathedral followed by a beyond beautiful reception at one of our favorite venues, Vibiana. 
It was a gorgeous autumn day – cool, crisp and a bit cloudy.  The Bride, dressed in a Lazaro gown and Christian Louboutin heals could not have been more stunning.  Her Hugo Boss clad Groom looked so handsome (and smelled amazing, trust me on this one J).  In the morning as they got ready they exchanged vows via messenger.  This sweet and intimate gesture seemed to bring a sense of calm to both of them.
Jessica and David are a very traditional couple who decided to forgo the popular “first look” and waited until Jessica walked down the isle to see each other for the first time.  Time seemed to stand still when David first saw his Bride standing at the end of the ilse with her father.  The opulence and splendor of SaintSophia’s was the perfect setting for their traditional Coptic Orthodox ceremony.

After the ceremony the Bride and Groom escaped to the Millennium Biltmore Hotel in Los Angeles before heading to Vibiana for photos.  This photo session was a great opportunity for Jessica and David to spend some time together, just the two of them, basking in the joy of their matrimony.  Rebecca with Docuvitae captured the most beautiful shots of this happy couple – don’t they just ooze happiness?!


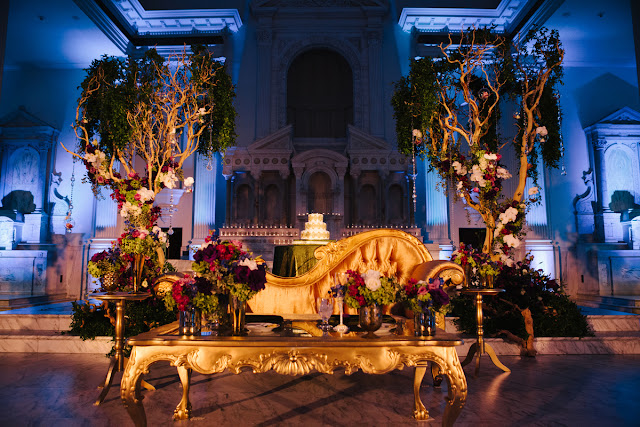
Vibiana was adorned with whimsical décor including stunning florals by Shawna Yamamto Event Design, vintage furniture, gold accents and amazing lighting.

In lieu of a Sweetheart Table, the Happy Couple enjoyed their own intimate lounge area just under the Vibiana alter.  It was georgeous, luxurious and cozy all at the same time!


Guests sipped Champagne as they dined on culinary delights prepared by Jay’s Catering.  The savory dishes were matched by the delicious dessert bar and wedding cake also prepared by Jay’s.

The evening was lively and filled with love, laughter and dancing!  A surprise performance by Jilliana’s SahlalaDancers really got the party going.  Guests danced into the early morning hours and finished off the amazing night by doing The Macarena!


We feel so honored to have been a part of this amazing day.  Cheers to a lifetime of love and laughter Mr. & Mrs. Gobrial!  

All photos courtesy of Docuvitae

Accommodations:  Millennium Biltmore
Belly Dancers: Jillina and the Sahlala Dancers       
Bar: The Cocktail Concierge     
Catering: Jay’s Catering
Church (ceremony):  St. Sophia’s Cathedral           
DJ:  DJ Nara
Event Design & Planning: Sterling Engagements
Floral Design: Shawna Yamamoto Event Design
Bride Hair: Shirin Salon
Bride Makeup: Monique Powers                 
Lighting and Sound: Amber Event Production
Photographer: Docuvitae
Rentals:  Classic Party RentalsArchive Event Rentals
Venue (reception):  Vibiana     
Videographer: Wind Production 

Sunday, November 11, 2012

Star's Favorite Sweets: Scrumptious Shortbread Cookies

It has finally started to feel like fall in So Cal and this weather puts me in the baking mood.  There are tons of new cookie recipes I am dying to try but I haven't had the chance to run to the store to buy the various ingredients.  So, on this crisp fall morning I decided to bake one of my most favorite old faithful cookies, shortbread.  I always have all of the ingredients for these cookies so they are the perfect treat to whip up when the urge strikes.  A friend of mine gave me this recipe a few years ago and it is so good, I've tossed all of my other shortbread recipes.  It is beyond simple (only four ingredients!!) and I bet you have all of them on hand on any given day.

I know you are probably thinking, "Shortbread?  Boring!" and I would have agreed with you until I tried this recipe.  It is honestly, simply perfect!  I've toyed with the idea of dipping these cookies in chocolate, but I've always opted against it... not because I don't think it would be delicious, but because I think they are absolutely perfect just the way they are!


This recipe is for a small batch and only makes about eight cookies (depending how how you cut them), but you can easily double the recipe if you need cookies for a larger crowd.  I always bring these cookies to the annual holiday cookie exchange my friends and I do and I've also made them for various other events.  They are perfect for showers and parties because they can be made a few days in advance and are pretty hardy and easily transported.

Ingredients

1 1/4 cups flour
1/4 cup sugar
1 stick of cold butter cut into cubes
3 tablespoons cornstarch
extra sugar and/or edible glitter to sprinkle over the top after the shortbread has baked

Directions

Combine all ingredients in a food processor and pulse until combined.  The dough will look and feel powdery and not doughy at all.  Pour the dough into a pie pan (or small square pan if you prefer square cookies) and press it until it is compact and flat.
In an oven that has been preheated to 325 degrees, bake the shortbread for 25-30 minutes or until it has just started to brown a bit.  I prefer my shortbread soft so I watch for the browned edges then quickly remove the pan from the oven.  As soon as the shortbread is out of the oven sprinkle it with sugar.  I also love to sprinkle my shortbread with clear edible glitter which I purchased from my local cake shop.


The shortbread is delicious with just plain sugar, but who doesn't love a little bling on their cookie?!  And believe me, offering your guests a glittery piece of shortbread will wow them and have them asking "is that glitter on the cookies?!"  So pretty and unexpected, especially during the holidays!  I am sorry that it is difficult to see the glitter on the cookies in these photos.

Once the shortbread has cooled for a few minutes cut into it like you would a pie and you'll have adorable little triangular cookies.  Note - you must cut into these while they are still warm.  If you cut into them when they have cooled they will crack and break apart.


These cookies pair perfectly with English style tea which is how I enjoyed mine on this blustery morning.  Such a delicious pairing and the perfect fall treat!
Happy baking!

-Star
Thursday, October 25, 2012

Star's Inspirations: Ombre Love!

Ombre is everywhere in fashion and beauty from hair color, to clothing to nails.  The ombre look has also become quite popular as a design element at weddings and events.  Ombre is a great way to tie your event colors together and is so easy to accomplish.  Florals and wedding cakes are great ways to use the ombre effect, but it can also be incorporated into other decor elements such as lighting, dessert bars, dresses and stationary.  The possibilities are endless which is what I love so much about this look!  It can be sprinkled in or used through your event.  It can be subtle understated or bold and intense depending on your design preferences.  

At one of our recent weddings, the bridesmaids wore navy blue dresses and the maid of honor wore a blue ombre dress which set her apart from the other girls.  The dress was truly stunning and it made me realize that I need more ombre in my life!  Check out these beautiful ombre designs.

This candy display is unique and so beautiful!

Photo courtesy of Young Married Chic

This ombre floral arrangement makes carnations look incredibly chic!

Photo courtesy of Ruffled

Ombre sugar hearts decorating a basic white cake?!  Love!  For a tutorial on how to make these sugar hearts, check out my previous post.

Photo courtesy of Wedding Chicks

Little cakes with bare sides show off the ombre layers.  The rosette frosting is the perfect topper.

Photo courtesy of Glorious Treats

I recently came across this in Lucky Magazine and thought it was stunning!  It would be be beautiful and unexpected on the fashion forward Bride or playful and fun on your Bridesmaids!
Photo courtesy of Moda Operandi

I don't even know where to start with this... I love everything about it!  What a great way to achieve an understated ombre look!

Photo courtesy of Loverly

Ombre escort cards tie pink, sherbet, yellow and cream together so nicely.

Photo courtesy of Once Wed

So classic and chic!

 Photo courtesy of Erin Ever After

Love the ombre bottles in the background.  Such a beautiful and unexpected design element!

 Photo courtesy of Etsy Shop Liddabits

This reminds me of a sunset... or cotton candy...  either way, it is so pretty!

 Photo courtesy of Revel

How pretty is the bouquet made of fabric flowers?!

Photo courtesy of Etsy Shop Autumn and Grace

This centerpiece is beautiful beyond words.  I love how it looks placed on a pink table cloth with the ombre favor boxes!

Photo courtesy of Vintage Rose Garden

This photo illustrates how lighting can truly transform your look.  This ombre lighting oozes romance!

Photo courtesy of A Good Affair
 
Another stunning ombre wedding cake.

 Photo courtesy of Cake Coquuette

And who can forget this dress?!  Trend setter Gwen Stefani boldly wore an ombre wedding dress at her  2002 wedding to Gavin Rossdale.  Stunning!


Photo courtesy of Fashion Munster

Sneak Peek: One of our recent brides utilized rose petals to create an ombre isle runner.  My apologies for the amateur cell phone photo; professional photos to come:)


Xoxo,
Star