Showing posts with label Gifts. Show all posts

Sunday, September 22, 2013

Star's Favorite Things: Spruce Up Your Tailgate!

The time has come to bid farewell to our bikinis and flip flops and replace them with scarves and boots.  Today marks the first day of fall and with fall comes football.  I'm not so much a fan of football, but I love a good tailgate!  Especially when it is filled with gourmet food options, unique beverages and adorable decor.  Football season is already in full swing so I thought I'd share with you some of my favorite tailgate pics.  They put a fun spin on traditional tailgate fare, and will make your tailgate unique and just a little bit chic! :)

    1. 1. This ice chest will keep your drinks as cold as the basic plastic ones, its just so much cuter! -  Peterboro Basket Co. 
    2. 2. Package napkins and utensils in these adorable little chevron paper bags.  Brown and white would be cute (the colors of a football) or use your team's colors! - Etsy shop Cherished Blessings 
    3. 3. If you are not a beer drinker, you can still sip your wine in (unbreakable) style :) -  Pinterest 
    4. 4. I'f you'll be barbecuing at your tailgate, I don't think any other grill will do.  This one is both adorable and functional! -  Strauss Inovation 
    5. 5. My love affair with paper straws has not ended (see previous post).  They come in every color so it is easy to match them with your team colors. - Etsy shop The Simply Chic Shop 
    6. 6. No tailgate is complete without Cornhole.  It quick to set up and can easily be played with a few drinks in you :)  Love this retro design! -  Gifts.com 
    7. 7. Keep those brewskies cold with these cute personalized koozies. - Etsy shop Happy Thoughts Gifts 
    8. 8. I love these football cupcake toppers!  They'd also look great topping pigs in a blanket, potato skins, or any other tailgate delight.  - Etsy shop Cute and Useful

Beer is generally the drink of choice at a tailgate so you want to make sure you have plenty of it on hand.  In addition to a variety of frosty bottles, consider mixing up a signature "beer cocktail" as well. Virtue Feed & Grain in Alexandria VA serves up this delicious beer cocktail.  Its a masculine cocktail with a touch of sweetness for the lovely ladies.  With the little bit of maple syrup, it is the perfect fall beverage!
Photo courtesy of Honest Cooking

Shock Me
1/4 cup brown ale beer
2 tbsp. bourbon
1 tsp. Southern Comfort
1 tsp. pure maple syrup

Combine all ingredients in a cocktail shaker with ice. 
Gently stir for 10 seconds.  Strain into an Old Fashioned glass.  Makes 1 cocktail.

And for the perfect dessert - Blue Moon Cupcakes.  I shared this recipe last year, but I thought I'd mention it again because it is so delicious and perfect for a tailgate!  Click here for the recipe.


Lastly, I wanted to share the little surprise I made for my hubby on the night of his favorite team's (the San Diego Chargers) first game.  Inside was a new Chargers T-shirt.  He loved the gift and appreciated that although I am not into football, I still understand how excited he is that the season has started :)  Consider wrapping up a T-shrit or jersey for that football loving honey before a big game!


Happy tailgating!!

-Star

Friday, July 26, 2013

Star's Inspirations: The Perfect Five Year Anniversary Gift

Last week my husband and I celebrated our five year wedding anniversary.  It was a wonderful day filled with love, memories, talks of the future, and gifts we will both treasure forever.  When we told people we were celebrating our five year anniversary, they congratulated us.  We appreciated the congratulations and agreed that being happily married for five years was definitely something to be proud of and celebrated!

In previous years we kept our anniversary gifts fairly simple but this year I knew I wanted to give my husband something special for this milestone.  Having just celebrated his birthday and Father's Day, I was feeling a bit stumped when it came to choosing his anniversary gift.  I wanted to get him something symbolic and sentimental - not necessarily expensive or luxurious though.  I knew there were symbolic gifts for every anniversary and thought that would be a good place to start (see infoplease.com for a complete list).  The gift for five years is "wood".  Kind of a tricky one in my opinion.  I was recently in Chicago and was fortunate enough to stumble upon Stitch - an amazing designer furnishings and accessories boutique in Bucktown.  There I found various cool "wood" options including clocks, bottle stoppers, and coasters; however, my favorites were their wooden boxes.  They come in a variety of sizes, wood types and finishes and to say they are gorgeous is an understatement!  Each box is unique, finished with a high gloss lacquer, suede lined and hand made in Italy.  They are stunning yet very masculine at the same time.  I ended up choosing a small and simple box with a dark finish.


My husband absolutely loves it!  He likes to empty his pockets as soon as he gets home from work and now he has a nice place to keep his things until morning.  I love that it is a beautiful piece of home decor that will always remind both of us of this milestone.  It was the perfect five year anniversary gift if I do say so myself!  If you are engaged and don't want to wait five years to give one of these beauties to your man, consider giving one as a wedding gift or even as a thank you gift to your groomsmen!


XOXO,

Star


Monday, March 25, 2013

Bling Wipes - Where Have These Been All Our Lives?!

We hope you are all having a great start to your week.  Today we want to share with you something that might make your Monday a little... sparklier!  Bling Wipes!  This amazing new product was created by a husband and wife team for those moments when you are on the go and notice that your bling isn't as blingy as it could be.  Bling Wipes are individually packaged, lint free, disposable towelettes that are perfect for convenient on the go jewelry cleaning.  Their unique solution restores jewelry's natural brilliance by removing oil, make-up, lotion and other residue.

Isn't the retro packaging just so cute?!
These are the perfect gift for a bride to be or just about anyone who likes to wear diamonds and prefers that when they do, they sparkle like they should!  These wipes don't just work on diamonds, they also work wonders on gold, silver, gemstones and even men's watches (although they are not intended for use on emeralds or pearls).  They can be purchased on the Bling Wipes' website.  A pack of ten individual wipes costs $12.00.  We are not affiliated with Bling Wipes, we just love this product!

Photos courtesy of Bling Wipes

Love,

The Sterling Team

Tuesday, August 21, 2012

DIY With Star: Perfectly Pink Coffee Filter Peonies

Oh peonies, how I love thee (as you can tell by my previous post "Perfect Peonies")!!  Unfortunately, peonies are only readily available for a few short months every year and since peony season is coming to an end I thought I would make my own version of this beautiful flower.  I still find it amazing that I was able to create a peony look alike out of coffee filters and I love that I can now have peonies around my house year round!

These coffee filter ponies fill a vase in my kitchen bay window when I don't have live flowers to display.  I prefer to have fresh flowers around the house, but these make a great substitution when I haven't had a chance to pick up a fresh bunch.  They are quite simple to make, so come on, give them a shot...


1. Supplies: 
  • -About 10 coffee filters per flower (give or take depending on how full you would like your flower to be).
  • -A glue gun (or other type of glue)
  • -Scissors
  • -Floral wire
  • -A bowl with one drop of red food coloring (you can use more than one drop if you want a darker pink; I however, prefer the super light blush pink)

2.  Trim the coffee filters.  I cut off about an inch.  This step can be skipped if you want very large flowers.

3. Fold coffee filters in half.

4. Continue folding the filters in half until you reach the size shown in the image.

5. Snip the corners to create a rounded top.

6. Unfold the filters and you will have a flower shape.  Complete the above steps with all filters.


7. Gather each filter by the center with the center point facing up.  

8. Dip the edges of the filter in the pink water.  Only hold it in there for a second or two.  The colored water will begin to seep up toward the center.  
NOTE: You can gather all of the filters together to complete these steps; however, if the are all dipped together, it can be difficult to separate them.

9. Let the filters dry by laying them out individually.  Cut a piece of floral wire and poke it through the center of one of the filters.

10. Fold a bit of the end to keep the flower in place, and apply a dab of glue.  

11. Before the glue dries completely, pinch the bottom of the flower.

12. Continue to thread individual filters toward the center flower, pinching and twisting a bit a the base of each one.  

13. Once all of the filters have been threaded, wrap the wire around the base of the flower a few times to secure it.

14. Fluff the flower until you are happy with its shape.  At this point, you can wrap the base and wire with floral tape to polish off the look.

NOTE: I do realize that the flowers appear white in the below photos.  Apparently my camera wasn't able to capture the beautiful blush color.  My apologies.
And that's it!  

I think these coffee filter peonies are just lovely and can almost be mistaken for real peonies when placed in a vase.  
These coffee filter peonies would be beautiful bunched together to make a DIY bouquet for the bride and/or her bridesmaids.  They would also be lovely in an arrangement, placed on tables as a centerpiece, sitting on atop each place setting, or attached to chairs for a pop of color and a bit of romance.  You can truly do so much with these little beauties.  They can be fluffed and re-fluffed without any damage being done, and since they are on wire and easy to maneuver, coffee filter peonies are incredibly easy to work.  The best part is they are non-perishable so they can be made in advance!  

These flowers may seem tedious to make; however, once they are dyed and dried, the assembly process is super fast.  Set up an assembly line and get your bridesmaids together for a peony making party!

I attached one of my coffee filter peonies to a white gift bag to dress up a birthday present for a friend. 


Happy crafting!!

-Star

Saturday, June 30, 2012

Star's Favorite Things: Welcome Bags & Packages

Your out of town guests are thrilled to be spending the weekend celebrating your day of matrimony; however, even with a blocked room rate, booking a hotel room for the wedding weekend can be costly.  On top of hotel costs, when you include the wedding and bridal shower gifts as well as the new cocktail dress they may have purchased just for your wedding, your guests may feel like they've forked out quite a chunk of change.  We all know they are happy to do it but wouldn't it be nice to give those out of town guests a little something extra to say "thank you"?  Consider surprising them with a welcome package!  It can be waiting for them in their hotel room or at check-in and is a great way welcome your guests and let them know you appreciate their presence.  It is also a chance to set the mood for the weekend ahead and give guests an idea of what they can expect.  A welcome package is a great way to tie your wedding theme in right from the beginning, as well as give your guests an opportunity to get excited about the upcoming festivities.

Start with something to hold the goodies in.  A reusable bag is a great option as guests can reuse them and will think of your wedding every time they pull it out.  If you are a DIY bride, you can purchase inexpensive canvas bags (Oriental Trading has them for less than a two dollars a piece) and stamp or iron your initials, monogram or message on the front.

Photo courtesy of Etsy

Photo courtesy of Style Me Pretty

I happen to think the stamped option, shown above, is just beautiful and is the easiest DIY option.  Simply choose a rubber stamp (Paper Source has gorgeous options), colored ink and have at it!  

Below is an example of an ironed on monogram.  It is beautiful but requires a bit more work.  Martha Stewart provides a step by step iron on tutorial on her website.

Photo courtesy of The Knot

The above DIY customization is fairly simple ; however, if you are not the creative type and still want to go all out on the bag, there are tons adorable custom bag options out there.  These are some of my favorites...


Photos courtesy of Wedding Chicks


Photos courtesy of Zazzle

If you'd prefer to go the simpler route, boxes, baskets or paper bags are also great goodie holders.  They can be personalized with stamps, ribbons, stickers and/or paper tags and can also save you a few dollars.

Photo courtesy of Ring of Yes

Photo courtesy of Etsy

Photo courtesy of Etsy

Once you've chosen your packaging, its time for the fun part... filling it with goodies!  Below are some things you may want to include:

  • -A letter from the two of you - This is your chance to welcome guests to your wedding weekend and to thank them for participating in your celebration.  This letter can be short and sweet or detailed with sentiments.
  • -Information about your wedding festivities - If your wedding weekend is full of events, a weekend itinerary is a nice extra to include.  If you are hosting a post wedding brunch or offering a shuttle service to and from the wedding site, this would be the ideal place to provide guests with these details.  Even if you've referenced this on your wedding website, it's always helpful to reiterate it for those guests who may have missed it initially.  
  • -Information about the area - Since the majority of guests staying at your hotel of choice are not from the area, it is also nice to include a list of restaurants, activities, and fun facts about the area.
  • -Snacks and beverages - It is nice to provide some treats for your guests to indulge in when they check into their hotel room or when they need a late night snack after a night of dancing at your wedding!  You can keep things simple by including things like chips, granola bars, candy and bottled waters, or you can go all out with a bottle of Champagne, gourmet nuts or olives, and truffles.
  • -Additional items - You may want to include items to make your guest's hotel stay more comfortable.  These items may include a candle for the room, cozy socks or specialty body washes and lotions.  It's also fun to include an item representative of your location.  Things like mugs, shot glasses, stationary, or even specialty treats from the local area are perfect additions.  This could be something like wine for Napa or kona coffee in Hawaii or even a local sport's team token item or souvenir which is always a favorite for the sport's lovers out there.  If your wedding is expected to get wild, you may also want to include recovery items too, such as Advil or Tylenol and a sleep mask :)
Again, these are just ideas to get you started - the possibilities are truly endless!  Remember, this is your opportunity to welcome your guests and set the mood for your wedding weekend.  Your welcome package can be silly and quirky, location specific (e.g. beach wedding), or elegant and luxurious.  Sit down with your love and put some real thought into what you will include and have fun!  If you met at a baseball game, include a bag of peanuts; if he proposed at Ghiradelli Square in San Francisco, include a few mini Ghiradelli chocolate squares; if you are going to Fiji on your Honeymoon, include a bottle or two of Fiji water.  Remember include a note explaining why each item is relevant to your relationship is a nice touch too so they understand why you choose the items you did. 

Below are some of my favorite welcome packages...

Photo courtesy of Martha Stewart Weddings

Photo courtesy of The Bride's Cafe


Photo courtesy of Brides Blogs

Photo courtesy of Real Simple

Photo courtesy of Etsy

Photo courtesy of Style Me Pretty

And something kind of fun to include for the party animals...

Photo courtesy of Intimate Weddings

If a complete welcome package is not in your budget, you can still provide out of town guests with a thoughtful welcome.  Consider something like this...

A tiny flower arrangement and welcome note hanging from their hotel room door.
 
Photo courtesy of Think Garnish

A small package including the morning paper, a pastry and coffee, delivered to their hotel room the morning after your wedding.

Photo courtesy of Think Garnish

Whether your budget is large or small, there are many ways you can give your out of town guests a special welcome.  This gesture will truly make their stay because who doesn't like a little surprise gift?!

Best,  

Star

Wednesday, February 22, 2012

DIY with Star: Simple Paper Flowers

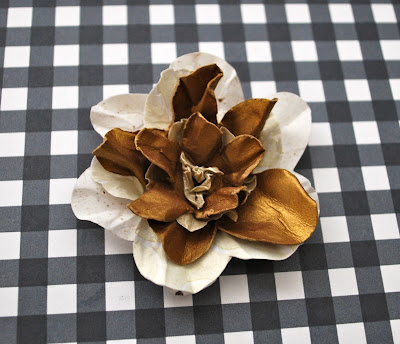
I absolutely love all things paper: scrap-booking paper, butcher paper, wrapping paper, card-stock... paper goods, paper decorations, paper embellishments, and crafting with paper!  I actually used these paper flowers as embellishments on my DIY wrapping post last December.  I've been making these paper flowers for quite some time and they are so simple, I had to share them with you!  All you need are scraps of paper and tiny brads, that's it!  You can use these adorable paper flowers to adorn packages or as table decorations.  You can even glue them to fishing line or ribbon to make paper flower garland.


Follow this simple tutorial to make your own...

Step 1:  Cut out approximately 6 paper flowers of varying sizes (they don't have to be perfect :).  The ones I cut were between approximately 1 inch to 3 inches; I also used a variety of colors and textures.  Once they are cut out, punch a small whole in the middle of each flower.


Step 2:  Starting with the largest flower on the bottom, pile the other flowers on top of one another from largest to smallest with the smallest flower on the top.


Step 3:  Take a small brad (I purchased these from JoAnn's) and secure it through the holes.


Step 4:  Quickly run the brad secured flowers under water.  You want them to be damp so the paper is pliable, but not so wet that the paper tears.  The thicker the paper, the more water it can handle.  Starting with the smallest flower on top, carefully fold it in toward the center.


Continue to work down the flower, carefully folding each paper flower in toward the center.


Once all of the flowers are individually folded into the center your flower will look like this:


Step 5:  Gently unwrap the flowers, starting with the largest one.  You can fuss with them a bit until you like what you see.  You can then let it dry and it will retain it's shape.


And there you have it.  A beautiful paper flower that took less than 5 minutes to make!


I used a dab of glue to adorn my gold flower to this little package.  This would be a perfect for a wedding or shower favor!


Give these puppies a try and let me know how it goes!  Happy crafting :)

Best,
Star

Thursday, July 23, 2009

New Registry with A Great Affair

So often do I have clients asking me how to register for items other than those at Macy's, Pottery Barn etc... There are so many options out there nowadays with Honeymoon Registries, Photography Registries and more... How do you choose?

While it is not in proper etiquette to ask for cash for your wedding. A registry like A Great Affair, gives you the option of asking for what you really want, while still not literally asking for cash.


So if you are one of those couples out there who has been nesting for long enough that your house is pleasantly full and you want another option... Here is a great way to kindly request what you truly would like for your wedding gifts!

Happy Registry!

Thursday, July 02, 2009

Special Mementos for Your Special Day from Not Just Any Old Day!

So for quite some time, we have been admiring the beautiful and utterly sentimental gifts and jewelry from Not Just Any Old Day. Their adorable items are so sweet and stylish, plus truly capture the essence of any special occasion. Whether you are celebrating a Wedding or Mitzvah, Anniversary or any other special event these mementos are just fabulous!


The calendar keepsake charms are a fun and unique way to celebrate and cherish life’s celebrations. Marked with a genuine Swarovski crystal on the month and day of your choice, the keepsake pieces are the perfect gift to yourself or someone else — it will forever hold special meaning.

The Not Just Any Old Day collection includes a wide variety of jewelry and gift ideas perfect for so many of life’s special celebrations.

To celebrate a special date in your life or the life of a loved one, there is no more charming gift than our timeless jewelry and gift line. “The new Calendar Key incorporates our “signature” calendar charm into a hip, stylish accessory that is not only unique and beautiful but a wonderful conversation piece” says Not Just Any Old Day designer and creator, Michele Esposito.


“Sentimental keepsakes have such incredible appeal because they bring an element of heartfelt thought to a gift” says Michele. A Not Just Any Old Day calendar keepsake can be customized for a wedding or anniversary, Bar/Bat Mitzvah, birthday or any other holiday or even just because.

Their prices range anywhere from $98-$1,595. We even think this is a great gift to give to a bride from all her bridesmaids!


Happy Shopping!